
a few years ago, my laptop broke. it’s an Acer Aspire 7 A715-71G, featuring 8gb of ddr4 ram, an i5-7300hq cpu and a nvidia gtx1050 gpu.
the hinge fell apart and the display cable was damaged. it was still usable but not as a laptop. i had to be extremely careful about the way i positioned the lid, otherwise the screen would turn blank.
i have used it that way for a while but it was clear that the screen would soon give out. repairing the laptop at the time didn’t seem like an option as the spare parts price nudged me to get a new machine.
so instead, i have decided to turn my laptop into a desktop computer.
1st issue: unusable primary display
by the time i chose to turn my laptop into a desktop, the screen did indeed give up and i could not get it to turn on no matter how much pressure i applied on the lower part of the screen bezel (that would usually make it work for a short while).
the easy fix: plug an external display via the hdmi port, disable the built-in screen in the settings and let the external display become the primary one.
✓ now i can use the computer and enjoy it even more as the original screen used to strain my eyes so much. it was a tn panel that did NOT look right. viewing angles were atrocious and color accuracy was definitely not something i could praise this screen about.
2nd issue: lap-frankenstein-desk-top?
my solution is working but it is a simple one and it still didn’t feel like i was using a desktop. i wanted to feel like i was using a machine that was made for this use case and not like i was desperately trying to hang on to a broken laptop that was held by tape.
i know what’s next: completely disassembling the laptop, discarding the integrated keyboard and touchpad and put what’s left of the machine (essentially, i just need the motherboard) into a box.
disassembling the laptop was pretty easy, the manufacturer used standard philips screws to secure everything in place. and while i was at it, i’ve added 4gb of ddr4 ram on top of the pre-installed 8gb.
first, i disconnected all the cables (touchpad, keyboard, battery, wifi/bt antenna, etc).
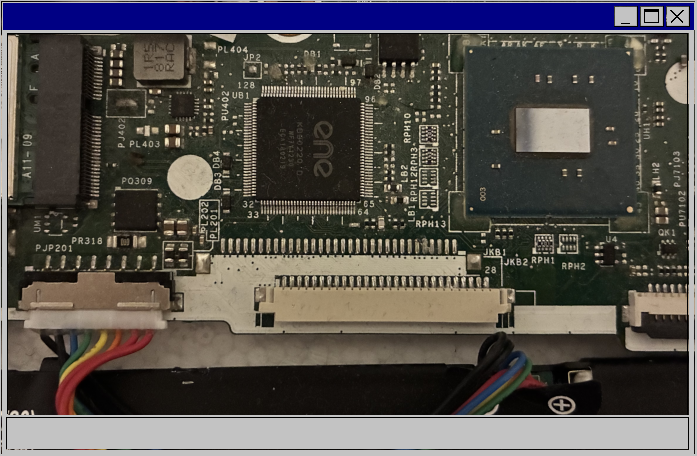
then, i’ve removed the motherboard from the shell.
now that i’ve got a clear look on the motherboard, i needed to look out for the power switch pins. i thought that it would be clearly labeled on the motherboard but it is not… (a clear oversight on my end)
i knew that it had to be located on the keyboard ribbon cable connector since the power button, more like a key, is integrated to this laptop’s keyboard.
i’ve scoured the internet thinking that someone may have run into the same issue with the same laptop but i couldn’t find anything.
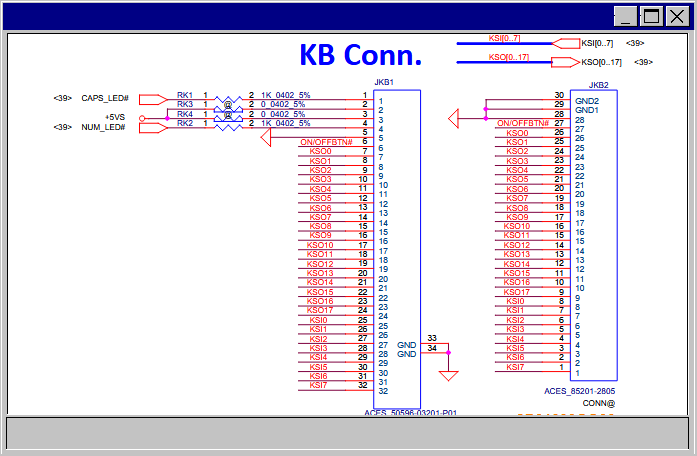
luckily, i was able to find something helpful for my project: the schematics for this specific motherboard (C5MMH/C7MMH LA-E911P) and more importantly, the keyboard pin layout.
the motherboard has two keyboard connectors (JKB1 and JKB2). i suppose that the motherboard manufacturer uses the same “base” on multiple models to lower costs.
the one that was used was JKB2 and it’s the most interesting out of the 2 for my use case because the ground pin and the power switch are next to each other. i can just test if the motherboard powers on by shorting the two pins (28 and GND) with a screwdriver.
and it works!
what’s next?
now that i have a clear plan for the next part of this project, i need to:
- design a case to protect the motherboard
- recreate an accessible power button
- enjoy!!
a few things i’ve found out during the writing of this article:
- the external display doesn’t work until the nvidia gpu driver is loaded, this could be a problem if i need to access the bios or if i want to reinstall the os
- the motherboard schematic mentions a way to disable the edp port, maybe i can force all video signal to go through the hdmi port without having to load the driver first (?)
- there is an unused m.2 sata ssd slot
- the cpu runs slower without the battery attached, basically there’s no turbo mode even with the high performance power plan enabled
Leave a Reply